Getting Started With Qualaroo
Qualaroo is a leading customer & user feedback software for surveying customers & prospects with non-intrusive Nudges™, which are 10x more valuable than email surveys. With Qualaroo, you can ask the right question to the right person at the right time.
Watch this quick video to get an overview of Qualaroo:
Or continue reading to understand it step-by-step.
Benefits of using Qualaroo:
- 10-30% response rate with in-context surveys
- Ask the right question at the right time
- Ask delightfully & politely
- 10x more valuable than email surveys
- AI-powered analytics & reports
- Install once; it never slows your page
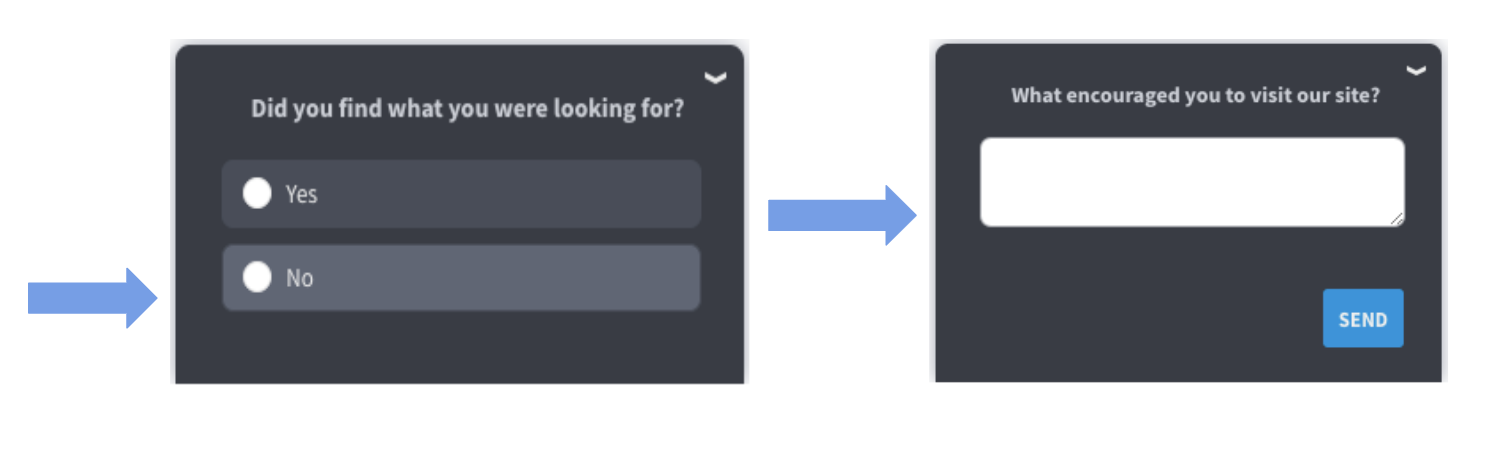
Here’s what the Qualaroo Nudge™ would look like:

This article will cover everything you need to collect user feedback with Qualaroo. We have included help articles for each topic that will help provide you with an in-depth look into each step. We are excited you’ve chosen Qualaroo!
1. Getting Started With Qualaroo
Getting Started With Qualaroo
To start using Qualaroo on your site, you need to:
1. Add Qualaroo code to your site
2. Make a survey with Qualaroo
3. Choose who will see the survey
4. Customize how the survey looks
Step 1: Install your Qualaroo Javascript
With a click of a button, you can have the code on your site quickly. From your Qualaroo Dashboard:
-
Select INSTALL CODE at the right end of your intended domain.

-
On the next screen, choose “Paste code in website source code or GTM.”

-
Copy the Qualaroo Javascript
Make sure to paste the Qualaroo Javascript right after the body tag of each of your pages, or use a tag manager such as Google Tag Manager.
Step 2: Create Your Nudge
This is where you can format the questions you want to ask and choose between specific answer types. Depending on the answer type, branching logic is included.

Step 3: Target your Nudge
You will proceed to the “Targeting” section once you have prepared your questions and answer options. This section allows you to control the following precisely:
-
Where should this Nudge show
-
The when, how often, and how long aspects of the survey
-
Notifications of responses

Step 4: Design Your Nudge
-
Choose a light or dark theme, or use a hex color code to change each element of the nudge’s look and feel.
-
Nudge placement
-
Add a background image

Step 5: Activate Your Nudge
There are several places to activate your nudge. The following are two example locations:
1. From your dashboard

2. In the editor, use the button at the bottom of the screen.

Step 6: View the data collected
- View the data collected in the Reporting dashboard.
-
Export your responses in CSV format either by reactions or by question.

We have also included a few suggested Best Practices for getting started with Qualaroo. Click the arrow to expand and read.
Best Practices for Getting Started With Qualaroo In this guide, you will find an overview of best practices that will help pave the way for you to increase your success using Qualaroo. The following suggestions mentioned in this article will help you with the types of questions that can increase your response rates and the value of the insights you gain. In addition to these suggestions, our doors are always open to chat about the best ways to get the most out of Qualaroo based on your specific use case. Before you create your first survey, consider your current goals. A helpful way to review your goals is to reflect on what you want your result to be. Use your objectives to guide your questions and what areas to focus on. Brevity should be a key goal in your survey design. Avoid long-winded questions and answer options. General guidelines we recommend when writing questions for your survey: Avoid the following: If you want to change any wording, targeting, or anything else on your survey, please do the following before making changes: 1. Temporarily Deactivate your nudge. 2. Clone the survey from the MORE dropdown per nudge. 3. Then make your changes to the new survey. We outline the recommended iterative approach in this help article to help optimize your response rate and quality of insights. Are you confused about which answer types to use? We recommend using the radio button and single answer selection as a go-to when in doubt. You can then branch to open text for qualitative feedback by starting with the radio button. Suppose you are interested in utilizing NPS/CSAT as a benchmark heuristic with Qualaroo to understand trends over time and identify strengths/room for improvement. In that case, it is helpful to recognize a surveying interval that works best for your business goals. The Net Promoter Score (NPS) measures the likelihood of your customers recommending your product or service to their friends, colleagues, and others in their network. The general rule of thumb with Qualaroo NPS surveys is only to ask one question with one follow-up question. A customer satisfaction score can be identified by how satisfied a customer is with a product or service. A scale of 1-7 or 1-5 to find the average scores among users gives an average satisfactory measurement. Qualaroo should be part of an ongoing strategy to learn why your visitors do what they do, whether it's for the voice of the customer, conversion rate optimization, testing your prototype, or market research. Before you create your first survey, try to identify which areas of the visitor experience are still in the dark. Are you unclear about who your highest converting visitor is? Do you have a high rate of people abandoning their shopping carts with products in them? Are you looking to uncover why certain landing pages have a high bounce rate? This process defines how you determine your goal for using Qualaroo. Once you determine your goal, you can start thinking about which question to ask and what areas to focus on. Here are some recommended questions for different goal types. Click here to see a comprehensive list of recommended questions. Ready to start on your survey? Check out our "Creating a Survey" section. Qualaroo is great at collecting insights that are spontaneous and 'in the moment'. The best response rates come from questions that pop-up for the right audience at the right time. You can't beat this combo. Even getting one of these right will give your survey a significantly higher response rate. We’d also like to remind you to be courteous of your visitors' sessions. Nobody likes getting bombarded with pop-ups. Asking the question "Did you find what you were looking for?" on the homepage after 3 seconds is probably not going to be received well. Below are some general guidelines: Ready to target your survey? Check out the "Targeting your survey section." Often times we humans can make things overly-complicated when they needn't be. When it comes to surveying visitors, this can hinder us from obtaining the information we really want. Simplicity should be a key goal in your survey design and unnecessary complexity should be avoided. Below are some general guidelines we recommend: Avoid the following: The information that comes from using a Qualaroo survey is considered qualitative - our main focus is on how visitors respond to your survey. Because of this, it is recommended that you consider tying your responses to the data in Google Analytics. These options add another level of reporting that we don't offer in our own dashboard, and no setup is required - just turn this on by clicking on the “Site Settings” tab in the dashboard. Think of your surveys as mini experiments. If something's not working, pause it, clone it and then make your changes. It’s also important to remember that in the beginning, you want to focus on the quality of the responses and try not to let the response rate distract you from that. Play with the questions you’re asking and the targeting until you feel that you’re starting to see responses with the most actionable data. We outline the recommended iterative approach in this help article. While our product allows you to have as many active surveys as you want, we do ask that you pay special attention to which targeted groups those surveys hit. If you have more than one survey targeted at the same visitor group, consider A/B testing them with our Optimizely integration. Another method would be to choose which survey you want to run first, gather your responses, then run the next one. Many customers will build a roadmap of the surveys they want to run over the course of their subscription. We have made a handful of suggestions on how to avoid survey collision in this help article. The only thing worse then not surveying your visitors is to survey them and do absolutely nothing with the information they provide. Qualaroo should be part of an ongoing strategy to learn why your visitors do what they do, whether it's for the voice of the customer, conversion rate optimization, or market research. Surveys aren't just something you should do then forget about. We recommend building different questions into a regular plan of gathering visitor intelligence, and having a clear plan for how the information you collect will influence other projects within your company.Identify Your Goals
You may ask:
You may ask:
You may ask:
Keep it Simple!
Take an Iterative Approach to Surveys

Where to start?
Benchmark Heuristics
Net Promoter Score (NPS)
Customer Satisfaction (CSAT)
Use the data you received for the responses you get!
Recommended Best Practices for Using Qualaroo
Identify What Your Goal Is
Identify the Target Audience
Keep it Simple
Correlate Quantitative Data
Take an Iterative Approach to Surveys
Be Smart when Running Multiple Surveys
DO SOMETHING with the responses you get!
That is a quick run-through of Qualaroo! If you have any questions or need anything at all, please reach out to us at support@qualaroo.com.
Related Articles: